DISCLOSURE: Some of the links in this post contain affiliate links, which come at no cost to you. In addition, it should be noted that I am part of the DecoArt Blogger Program and was provided product samples. I only promote and share products I personally use and recommend! To learn more, please review my disclosure policy here.
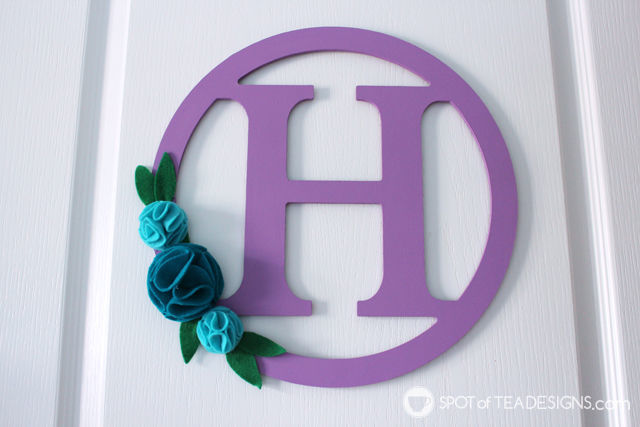
When all you have is a hallway of white doors, it’s time to spruce it up with colorful bedroom door hangers to match the bedroom décor! See how to create a three dimensional felt flower to help add some texture and color to your hallway and bedroom doors!

When taking, what seems to be, my weekly stroll through Michaels, I saw their fun raw wood alphabet collection was now on mega clearance. I picked up an “H” and a “B” for my girls at 80% off for only $1.32 EACH! SCORE! They needed a little sprucing up but figured they’d be great on their bedroom door. In came my trusty Deco Art Americana Acrylic Paint!

One morning while Hailey napped, Brielle helped me add a base coat to each of these letters.

At 3, Brielle will tell you her favorite color is yellow so I’ve slowly been adding yellow accents to her pink, grey and white bedroom. #FuturePostAlert

Since the bright yellow was a little TOO bright for our needs, I toned it down when mixing it with some Snow white.

To add some texture and dimension, I gave some felt flowers a try! Supplies:
- Felt
- Hot Glue Gun
- Scissors (these are my favorite scissors for cutting felt, as seen on my Under the Sea Quiet Book)
- Water Eraseable Pen (now preferred over air eraseable for sewing/felt crafts)
- Circle template (I punched mine from my paper punches but you could also trace a glass)
- Silicone cutting mat (not required but recommended for glue fun work as it peels right off after you’re done!)

First trace your circle shape 7 times. 6 are for the folded flower portions and one is to use as the base.

(Sorry for some reason I didn’t remember I was stepping out the photos with the pink felt and switched to the blue flower!) Now fold 6 of the circles into the shape shown. To do so, put a dab of glue in the center and fold once. Then put another dab of glue and fold again.

Repeat so you have 6 folded pieces and one flat circle shape as the base.

Glue 4 of the folded pieces on the circle base. Try to mirror the pieces so the folds are going different directions.
Add a dab of glue on top and lay the top two pieces down to complete your felt flower.

Repeat to create additional folded flowers.

Glue onto the wood letters, adding green felt leaves.

To hang the door hangers, I used these nifty Command Picture Hanging Strips that allowed these to stay flush against the doors.

Now each girl has their own letter on their door! This is especially a big hit for a certain someone who is obsessed with identifying letters, especially those in her family’s names, these days!

Oh and #momtip – buy pool noodles and cut them to fit on the top part of the door. It acts as a stopper so they can’t lock themselves (or their sister) in their room! We have one on all the bedroom and closet doors upstairs. If you’re curious, you can see more of our babyproofing items on this post.

Learn more about Deco Art via their website | Facebook | Twitter | Pinterest | Instagram | Youtube.

Check out the full Under the Sea Nursery reveal!

See this felt shape technique used on a Mickey Mouse headband!


Leave a Reply