• Skip to primary navigation
  • Skip to main content
  • Skip to primary sidebar
  • About
    • Meet Tara
    • Contact
    • Disclosure
    • Family Photography
    • PR & Advertising
    • Privacy Policy
  • CRAFT
    • Edible Food Crafts
    • Fabric Crafts
    • Home Decor
    • Kids
    • Papercrafts
    • Party DIY
    • Printables
    • SVG Cut Files
    • Wearables
  • PARTY
    • Baby
    • Birthday
    • Christmas
    • Easter
    • Father’s Day
    • Halloween / Fall
    • Mother’s Day
    • Patriotic / Summer
    • School / Grad
    • Sports
    • St Patricks Day
    • Thanksgiving
    • Valentine’s Day
    • Wedding
  • Home
    • Basement / Garage
    • Bathroom
    • Bedroom
    • Entryway
    • Kitchen
    • Living Room
    • Office
    • Outdoors
  • LIFE
    • Blog Life
    • Favorite Products
    • Organization
    • Parenting
    • Travel
Spot of Tea Designs

Spot of Tea Designs

8 Steps to Planning and Decorating Your Nursery

in Bedroom, Home Decor & Landscaping

One of the most fun parts in expecting a little one is planing and decorating their nursery! What theme will you choose? Which color scheme will you paint? Will you DIY or make any decorative pieces?  Here are the eight steps I followed when decorating a nursery, but really these tips can be used to decorate any space in your home.

8 Steps to Planning and Decorating your #Nursery | spotofteadesigns.com

DISCLOSURE: Some of the links in this post contain affiliate links, which come at no cost to you. Know that I only promote products I personally use and stand behind. To learn more about my affiliates, please review my disclosure policy.

Before going any further, mom-to-be, please read my Tips for Setting Up Your Nursery post which may call attention to some safety issues you may not have considered before. They won’t be immobile babies forever!

Create a room diagram showing furniture placement when planning a baby nursery | spotofteadesigns.com
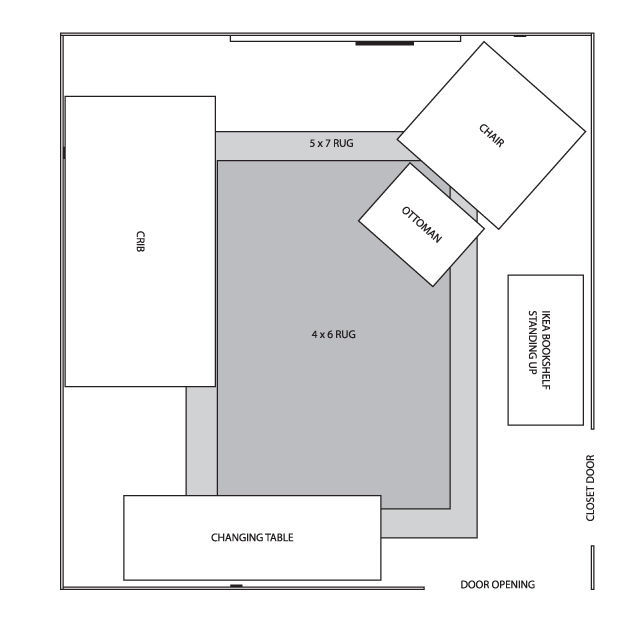
  1. Measure the room and draw up a diagram. Measure each wall. Measure the heights and widths of windows for curtain decorations. Make sure to draw in any electric outlets and air vents so you know any limitations in those spaces. I went high tech with a digital design done in my graphics program but you can rock it old school with a simple pencil drawing too! Here’s the key takeaway: email yourself the final diagram so you always have it on hand if you’re out shopping!Under the Sea #Nursery Color Palette - @DecoArt_Inc Americana Acrylic Paint | spotofteadesigns.com
  2. Choose a theme and color palette. Consider these points: are the walls already painted a color you like? Do you have a childhood item, favorite textile pattern or wall art you want to use as inspiration? Does your family have a specific interest you’d like to pass onto your child (favorite sport/sports team), hobby (fishing), or destination (beach)? Hit up Pinterest and work up your secret board of nursery ideas!
  3. Paint the walls. If you’re doing something different than what was already there, now’s the time to paint the wall and get your blank space ready!Gender Neutral Sea Turtle Baby Nursery Reveal: Greens, creams and light browns | spotofteadesigns.com
  4. Buy the furniture. Start with the big ticket items that take up the most room and ask yourself “what furniture pieces will make the room functional?” Consider the basics like a crib, changing area, and chair for mom. If you have a larger room, you can also add things like toy chests and bookshelves.
  5. Once furniture has been purchased, tape it off in the room! There may be a delay in furniture shipment, but don’t let that stop you from moving forward in the creative planning process. Use your painter’s tape to lay out the shape of furniture on the floor/walls to get a better idea what you have to work with. The room will always feel tighter with furniture in it so this may stop you from overbuying!Gender Neutral Modern Animal #Nursery | spotofteadesigns.com
  6. Buy or DIY. If you’re a crafty mom, it’s time hand craft some items for little miss or mister. If you’d rather buy than DIY, get shopping! If you want that crafty look but don’t have the time/talent, consider shopping on etsy for custom handmade work to make the room complete! If desired, don’t forget to personalize their space with something stating their name or initial, much like the yarn wrapped letters I made for Brielle’s room or ombre painted ones I made for Hailey’s.
  7. Assemble, accessorize, hang and prepare! All your hard work of researching, analyzing, pinning and buying is about to pay off! With all your temporary markings in place, go ahead and start nailing in the walls, assembling the furniture and washing those newly purchased sheets!
  8. Accessorize! After the bigger ticket items, you can focus on the fun stuff: the cute accessories! For textiles, consider a soft rug for baby to crawl on, curtains to block out light while they’re sleeping, crib sheet and crib skirt to decorate their bed space, and a coordinating changing pad cover. Add bookends, a garbage can, laundry basket or hamper, wall art items, or picture frames to complete your look! Tip: Just like my step # 5, use scrap paper cut to the size of any wall art and your painter’s tape to temporarily hang up any wall art before putting holes in the wall. Under the Sea Nursery - Ombre Letters over crib | spotofteadesigns.com

Now you’re on your way to a beautiful space for your little miss or mister!

Want to see more inspiring nurseries featured on this post? Check out Lauren & Frank’s Beach Themed Nursery, Allie & Tim’s Modern Animal Themed Room,  Brielle’s Grey, Pink and White Nursery or Hailey’s Under the Sea themed Nursery!

  • Click to email a link to a friend (Opens in new window) Email
  • Click to share on Facebook (Opens in new window) Facebook
  • Click to share on X (Opens in new window) X
  • Click to share on Pinterest (Opens in new window) Pinterest
  • Click to share on Reddit (Opens in new window) Reddit

Related

in Bedroom, Home Decor & Landscaping

Spotofteadesigns.com Signature Design showing ways to socially follow this DIY/Parenting blogSpotofteadesigns.com Signature showing how to follow on twitter. Username: spotofteadesignSOTD2019SignatureFollow4FacebookSpotofteadesigns.com Signature showing how to follow on pinterest. Username: spotofteadesignSpotofteadesigns.com Signature showing how to follow on instagram. Username: spotofteadesignsSpotofteadesigns.com Signature

Reader Interactions

Leave a ReplyCancel reply

This site uses Akismet to reduce spam. Learn how your comment data is processed.

Primary Sidebar

Meet Tara

You can probably find me in my craft room, in front of a computer or behind the camera lens.
LEARN MORE

EMAIL NEWSLETTER SIGN UP

Sign up and be the first to know about new posts filled with printables, svg cut file designs and gift ideas!

Privacy Policy

VALENTINE’S DAY

No sew woven heart pouches | spotofteadesigns.com
You're clawsome flower claw clip printable tag | spotofteadesigns.com
XOXO Valentine Bag Toppers - printables to dress up your Valentine's Day gifts this February | spotofteadesigns.com
DIY Valentine Sock Plush Tutorial | spotofteadesigns.com
Smiley face eraser Valentine Printable | spotofteadesigns.com
Shop the Spot of Tea Designs Amazon Store front | spotofteadesigns.com

Amazon Associates Disclosure

Tara Nehil is a participant in the Amazon Services LLC Associates Program, an affiliate advertising program designed to provide a means for sites to earn advertising fees by advertising and linking to Amazon.com.
Privacy & Cookies: This site uses cookies. By continuing to use this website, you agree to their use.

To find out more, including how to control cookies, see here: Cookie Policy

LATEST GRAMS

I'm bringing back a classic Valentine's Day craft I'm bringing back a classic Valentine's Day craft with these DIY Woven Heart Pouches and OlyFun from @fairfieldworld World AD
.
See how OlyFun cuts easily like butter for this retro craft! Grab the FREE template and follow the step by step photos over on my blog. 
.
.
.
#spotofteadesigns #fairfieldworld #olyfun #polyfilwithjoy #valentinesdaycraft retrocrafts
Is there anything easier than putting together a g Is there anything easier than putting together a gift basket based on a colorway? If you're already thinking ahead to when your basketball season is over and want to celebrate with your teammates, grab this "Thanks for a great season" tag that pairs well with all things ORANGE!
.
.
#spotofteadesigns #basketballmom #basketballseason #sotdprintables
Gift flower claw clips for Valentine's Day or as a Gift flower claw clips for Valentine's Day or as a birthday party favor using this "You're Clawesome!" printable. 
.
Leave the comment CLAWSOME and I'll send you the blog post link that includes the bulk pack of these clips and a link to grab the instant download printable!
.
#spotofteadesigns #partyfavor #valentinesday #classroomvalentine #printables
Follow me for cute Valentine's Day printables and Follow me for cute Valentine's Day printables and SVG cut files perfect for classmates for the holiday!
.
#spotofteadesigns #valentinesday #classroomvalentine #printables #svgcutfiles
Since this year is Year of the Horse I'm sharing a Since this year is Year of the Horse I'm sharing another party styling shoot out from the archives with a horse theme! This birthday party was a fun licensed partywear shoot featuring the characters from the Spirit franchise that is a cute show (and movie).
.
Party highlights:
🎉Cute themed horse cupcakes made with Nutter Butter cookies
🎉DIY horseshoe backdrop
🎉Fun pink, blue and white color scheme mixed with patterns
.
.
#spotofteadesigns #partyinspo #yearofthehorse #eatdessertfirst #sugarhigh #horseparty
Basketball Bag Tags are the perfect little gift fo Basketball Bag Tags are the perfect little gift for a basketball team so they can all tell their gear bags apart. 
.
Visit my blog for the FREE svg cut file plus the link to all the supplies to create these personalized acrylic disc keychains for your team. Go Ravens!
.
.
#spotofteadesigns #cricutmade #cricutcreated #vinylallthethings #basketballmom
Follow on Instagram
2025 © Spot of Tea Designs
made by soulmuse