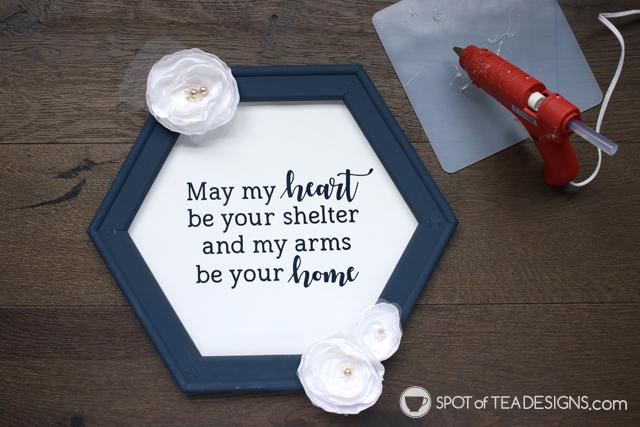
Get more use and a new style out of those basic staple back canvases with the reverse canvas technique! Make this piece of wall art special by adding icons or phrases that have meaning in your life or match your home décor. Learn how to turn a plain store bought canvas into an upscale piece of art with this reverse canvas wall art.

After being in our house for over 6 months, I’ve been itching to add more personal touches to our wall space. I take so many photos yet we have any printed and displayed in our home and that needed to change ASAP. I decided to start with the bedroom, a place uniquely only Derek and mine. What’s more about the two of us than our life before kids, right?

This space above his dresser is now more personalized with an enlarged photo from our wedding and a reverse canvas featuring our wedding vows. I’m so excited for this final outcome as I love how it looks but am excited I got to try a new technique with my Cricut!

Supplies:
- Store bought canvas
- X-acto knife
- White acrylic paint (love me some Deco Art Americana paint!)
- Staple gun
- Heat Transfer Vinyl
- Iron or Heat Press
- Cricut Explore Air 2
- Saw Tooth Hanger

First, turn the canvas over and use an X-acto knife to cut the canvas from the back of the frame. Do this by cutting right along the staples to remove the canvas.

Flip the frame over and paint or stain the wood surface, or get a trusty helper to do it for you! Tip: lift it up on blocks so it doesn’t get stuck to your protected surface.

I chose Deco Art Americana paint for this project as I wanted a deep blue look and I love their paints! But I’ve seen stain used with this technique which really drills home that “farmhouse” look, if that’s what you’re going for. If you want to add a sheen to it, add a polyacrylic over the frame. I opted to keep mine matte and just did two layers of paint.

Cut your HTV vinyl with your Cricut in the colors desired. I chose to pull these two lines from our wedding vows. Tip: Make sure to mirror your design before sending to print!
Lay the frame over the canvas. Lay your vinyl in place and push down the sticky sheet to keep it in place.

Lift the wood frame away and iron on your vinyl phrase using a piece of parchment paper.

Place the frame back over the canvas to get the position correct and slowly flip it over. Pull the canvas tight and use a staple gun to secure the canvas to the frame.

Cut away the extra canvas behind the frame.

Attach a sawtooth hanger to the back so you’re able to hang your wall art on the wall and embellish as desired.

The top left floral decorations is actually the hairpiece I made and wore at my wedding.

The bottom two florals were replicas I made when creating a belt decoration I wore when pregnant with Brielle.

This reverse canvas is complete! I’m not only in love with this particular design (the hexagon has me all heart eyes) but I’m pretty addicted to this reverse style technique!

My reverse canvas frame is hung next to this framed photo of our wedding in a Chelsea white frame from Custom Picture Frames. I was able to choose a mat width (and color if I had wanted it) to complete my look.

My favorite part of this frame (besides the memorable photo) is the non-glare acrylic option I choose for the glass. It provides almost a matte effect and not a super shiny glare you often get from frames. You’ll for sure be seeing more of this glass type in my house going forward!
Those looking for a beautiful frame with custom sizing options, like this, can check out Custom Picture Frames now and get 20% off your order with my code: spotofteadesigns.

I’m so happy with this little corner of our bedroom that’s all about our special wedding day. From the enlarged photo to the two lines from our vows, to the floral decoration I wore, it’s all about our wedding that began our family in this home.

We’ve almost been in our house for a year now so it’s about time I started adding more framed art on the walls, right?
Related Posts


I had to laugh because I LITERALLY am doing a reverse canvas project myself right now & chose Deep Midnight Blue paint for mine, too! Looks great, love the hexagon look!
so fun! Hope you’ll post what you made!