• Skip to primary navigation
  • Skip to main content
  • Skip to primary sidebar
  • About
    • Meet Tara
    • Contact
    • Disclosure
    • Family Photography
    • PR & Advertising
    • Privacy Policy
  • CRAFT
    • Edible Food Crafts
    • Fabric Crafts
    • Home Decor
    • Kids
    • Papercrafts
    • Party DIY
    • Printables
    • SVG Cut Files
    • Wearables
  • PARTY
    • Baby
    • Birthday
    • Christmas
    • Easter
    • Father’s Day
    • Halloween / Fall
    • Mother’s Day
    • Patriotic / Summer
    • School / Grad
    • Sports
    • St Patricks Day
    • Thanksgiving
    • Valentine’s Day
    • Wedding
  • Home
    • Basement / Garage
    • Bathroom
    • Bedroom
    • Entryway
    • Kitchen
    • Living Room
    • Office
    • Outdoors
  • LIFE
    • Blog Life
    • Favorite Products
    • Organization
    • Parenting
    • Travel
Spot of Tea Designs

Spot of Tea Designs

DIY: How to Turn an Old Book Into a Ring Box

in Celebrations, Crafts & DIY, Wedding & Engagement

If you’re getting married, consider this fun alternative to the traditional ring pillow. Look how to hollow out the inside of a book to create a hidden spot for a ring box! Choose a book that’s meaningful to your life or one that represents a good story of love!

How to turn an old book into a ring box | spotofteadesigns.com

DISCLOSURE: Some of the links in this post contain affiliate links, which come at no cost to you. Know that I only promote products I personally use and stand behind. To learn more about my affiliates, please review my disclosure policy.

For those who don’t already know, the “t” in spot of tea designs stands for my name, Tara. That name, along with my sister’s, Melanie, are named from the epic novel Gone with the Wind by Margaret Mitchell. Tara is the plantation in the novel, named after a sacred hill in Ireland. Or as my dad liked to playfully tease me as a kid “your name means dirt” and in way, I guess it does! :)

As the book means something in my life, I wanted to use it in some way at the wedding and decided to turn one into a ring box.

Please note: I used from this tutorial as my basic guideline on how to do this project.

Supplies:

  • Hard cover book (I bought mine at a used book store for $5!)
  • Pencil
  • Ruler
  • White glue
  • Water
  • Small cup/bowl
  • Painbrush
  • Craft knife
  • Fabric
  • Needle/Thread
  • Stuffing
  • Ribbon
  • Scissors (not shown)

To make the pillow:

Step 1. Cut 2 squares of fabric. Sew a piece of ribbon on the right side of one square. This is where you’ll tie the rings.

Step 2. Put the 2 right sides together and use pins to secure (yes the ribbon should be inside this pocket made). Sew around the outside, leaving about 1 inch open.

Step 3. Once sewn, using the hole left open, turn your pillow right side out. Insert stuffing.

Step 4. Try your best to sew the hole closed with a hidden stitch. I have no tips on that step as I was basically winging it! :)

To make the hollowed out book:

Step 1. Open the book and decide on a page that you want to be your top page shown. (I chose the front title page of the book). Flip that page to the left and save it for a later step. The next several steps will be completed with the remaining pages of the book on the right.

how to make a hollowed out book, first glue the edges

Step 2. Mix together a solution of part water part glue. Squeeze the book pages together and use a paintbrush to apply the glue solution to the pages on the outside spine. (I applied 2 generous coats)

Step 3. Add something as spacers between the saved page and the remaining glue pages so they don’t touch and place something heavy on top and set the book aside to dry. (I used thick cork coasters and set my OTT lite on top. I’ve also heard the trip to add a piece of wax paper in between these pages for extra protection since the glue does not stick to the wax paper)

Step 4. After drying, flip open the book, making sure to keep the saved pages to the left. Draw our your box shape on the first glued page on the right using a pencil and ruler. (I made my box about 3 x 3″ which was slightly bigger than my pillow)

Step 5. Make sure you have a new blade on your craft knife. Use your ruler and begin making cuts into the book. This will take a while. Don’t get frustrated and just take your time. Don’t try to cut all the way down on one side as once. Cut a bunch of pages, then spin and cut the next side and continue. I did this for about an hour while watching an episode of Oprah’s Next Chapter.  :)

Step 6. As it starts getting deeper, see if you can peak and decide what page will be your inside landing page. Once you get there, clean out all the scraps and pieces inside the book. I chose to stop when I knew my ring pillow would fit safely inside.

Step 7. Brush the glue solution on the inside pages and a second layer on the oustide.

Step 8. Apply glue to the rim of the book and place the saved page from step 1 in place.
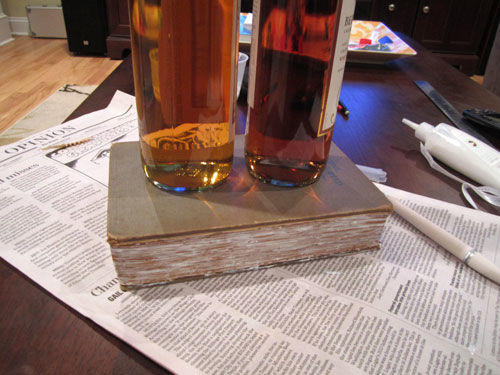
Step 9. Close the book, without spacers, and place your heavy object on top and allow to dry. Yep, wine bottles do the trick!

Step 10. Use a ruler and the craft knife and try to carefully cut the top page to showcase the hole. Tip: if your hole is a square or rectangle, first cut a diagonal line across to expose the hole. This will give you better guidance to know where you need to cut the straight lines to mimic your original hole.

Step 11. Once dry, place your pillow and rings inside.

Related Posts:

DIY Wedding Hairpiece Tutorial | spotofteadesigns.com
  • Click to email a link to a friend (Opens in new window)
  • Click to share on Facebook (Opens in new window)
  • Click to share on Twitter (Opens in new window)
  • Click to share on Pinterest (Opens in new window)
  • Click to share on Reddit (Opens in new window)

Related

in Celebrations, Crafts & DIY, Wedding & Engagement # our 9-22-12 Wedding

Spotofteadesigns.com Signature Design showing ways to socially follow this DIY/Parenting blogSpotofteadesigns.com Signature showing how to follow on twitter. Username: spotofteadesignSOTD2019SignatureFollow4FacebookSpotofteadesigns.com Signature showing how to follow on pinterest. Username: spotofteadesignSpotofteadesigns.com Signature showing how to follow on instagram. Username: spotofteadesignsSpotofteadesigns.com Signature

Reader Interactions

Comments

  1. Nicole says

    January 5, 2013 at 11:01 pm

    did you cut a first edition Gone With The Wind book? I have one too and mine is worth $5000

    Reply
    • spotofteadesigns says

      January 6, 2013 at 8:31 am

      Wow nicole you are super lucky! Mine was a first edition but a 30th printing, had water damage and a broken spine so its not worth anything. However this summer i found another copy in much better condition at an estate sale and dont plan on cutting it :)

      Reply
  2. Isabel Albelda Ros says

    February 14, 2021 at 12:43 pm

    Hi there! Thanks for sharing, looking forward to doing something similar :)
    What do you do to keep the book closed? I was thinking maybe a ribbon on each end, but not sure how I’d do it…

    Reply
    • Spot of Tea Designs says

      February 15, 2021 at 9:50 am

      My book had a heavy enough cover that I didn’t need to do much to keep it closed. A ribbon sounds cute though! Maybe glue it under the first sheet and the last sheet?

      Tag me if you make the book!

      Reply

Leave a ReplyCancel reply

This site uses Akismet to reduce spam. Learn how your comment data is processed.

Primary Sidebar

Meet Tara

You can probably find me in my craft room, in front of a computer or behind the camera lens.
LEARN MORE

EMAIL NEWSLETTER SIGN UP

Sign up and be the first to know about new posts filled with printables, svg cut file designs and gift ideas!

Privacy Policy

HALLOWEEN

Something Wicked This Way Comes SVG | spotofteadesigns.com
Halloween Candy Taste Test Printable Halloween Game | spotofteadesigns.com
How to make your own spell books - a fun DIY Halloween decoration from thrifted books! | spotofteadesigns.com
DIY Zombie Candy Bowl - thrifted doll toy turned into a candy bowl for a zombie Halloween party | spotofteadesigns.com
Retro Halloween Jack-O-Lantern SVG - Retro Halloween Cupcake Toppers | Spotofteadesigns.com
Shop the Spot of Tea Designs Amazon Store front | spotofteadesigns.com

Amazon Associates Disclosure

Tara Nehil is a participant in the Amazon Services LLC Associates Program, an affiliate advertising program designed to provide a means for sites to earn advertising fees by advertising and linking to Amazon.com.
Privacy & Cookies: This site uses cookies. By continuing to use this website, you agree to their use.
To find out more, including how to control cookies, see here: Cookie Policy

LATEST GRAMS

Throwback to our Pete the Cat DIY Halloween costum Throwback to our Pete the Cat DIY Halloween costume from a few years back. Hoodie + warm pants and red sneakers? Groovy! 
.
Step by step details --> https://spotofteadesigns.com/pete-the-cat-halloween-costume/
.
.
.
.
.
#spotofteadesigns #diyhalloweencostume #diyhalloween #hoodie #diyhoodie #petethecat #bookworm #spookyseason #trickortreat
Something wicked this way comes - SVG cut file des Something wicked this way comes - SVG cut file design now available in my etsy shop. Today I show it to you on an oversized crew sweatshirt #gifted by @presshallmade, but later this week, I'll show you the design on a piece of wall decor. Make it extra spooky with Glow-In-the-dark @sisernorthamerica vinyl!
.
.
Design: Spot of Tea Designs etsy shop
.
.
#spotofteadesigns #presshall #presshallmade #Halloween #svgcutfile #cricutmademedoit #cricutcrafts #cricutmade #cricutcreated #halloweensweatshirt #somethingwickedthiswaycomes #wicked #spookyseason
BLOOPERS REEL - I painted these shoes for a (no lo BLOOPERS REEL - I painted these shoes for a (no longer around) client and the blooper clips of my husband trying to figure out a zombie walk still makes me laugh to tears. Hope you like it as much as me. 
.
Tutorial on these painted shoes is over on my blog. Spotofteadesigns.com 
.
.
.
.
#spotofteadesigns #zombiecostume #zombieparty #diyshoes #diyhalloween #halloweenlife #halloweencostume #paintedshoes #painting #trickortreat
DIY ZOMBIE SHOES - made with paint! . See the ste DIY ZOMBIE SHOES - made with paint! 
.
See the step by step instructions on how I painted these from black Walmart shoes over on Spotofteadesigns.com
.
Link: https://spotofteadesigns.com/diy-zombie-shoes/
.
.
.
.
#spotofteadesigns #halloweencostume #diyhalloween #diyshoes #paintedshoes #zombie #walkingdead #painting #halloweenlife #craftersgonnacraft #makersgonnamake
2023 (yesterday) ➡️ 2012 (I do) ➡️ 2003 (o 2023 (yesterday) ➡️ 2012 (I do) ➡️ 2003 (our one year dating anniversary)
.
A small appreciation post for the guy I've known more than half my life who's often the handyman or instagram husband behind a project or shoot on this blog and my feed. Happy 11th anniversary @derekneh
.
.
.
.
.
#spotofteadesigns #anniversary #wedding #husbandandwife #11years
Heard this audio and instantly thought of PRINTABL Heard this audio and instantly thought of PRINTABLES, didn't you? 🤣
.
Check Spot of Tea Designs etsy shop for your Halloween printable needs!
.
.
.
.
.
#spotofteadesigns #halloweenprintable #halloweenparty #halloweentreat #trickortreat #etsydigital #etsylove #lollipop #etsyseller #printables #printabletag
Follow on Instagram
2021 © Spot of Tea Designs
made by soulmuse