• Skip to primary navigation
  • Skip to main content
  • Skip to primary sidebar
  • About
    • Meet Tara
    • Contact
    • Disclosure
    • Family Photography
    • PR & Advertising
    • Privacy Policy
  • CRAFT
    • Edible Food Crafts
    • Fabric Crafts
    • Home Decor
    • Kids
    • Papercrafts
    • Party DIY
    • Printables
    • SVG Cut Files
    • Wearables
  • PARTY
    • Baby
    • Birthday
    • Christmas
    • Easter
    • Father’s Day
    • Halloween / Fall
    • Mother’s Day
    • Patriotic / Summer
    • School / Grad
    • Sports
    • St Patricks Day
    • Thanksgiving
    • Valentine’s Day
    • Wedding
  • Home
    • Basement / Garage
    • Bathroom
    • Bedroom
    • Entryway
    • Kitchen
    • Living Room
    • Office
    • Outdoors
  • LIFE
    • Blog Life
    • Favorite Products
    • Organization
    • Parenting
    • Travel
Spot of Tea Designs

Spot of Tea Designs

Paint Your Own Monster T-shirt

in Celebrations, Crafts & DIY, Halloween / Fall, Kids' Crafts, SVG Cut Files, Wearables

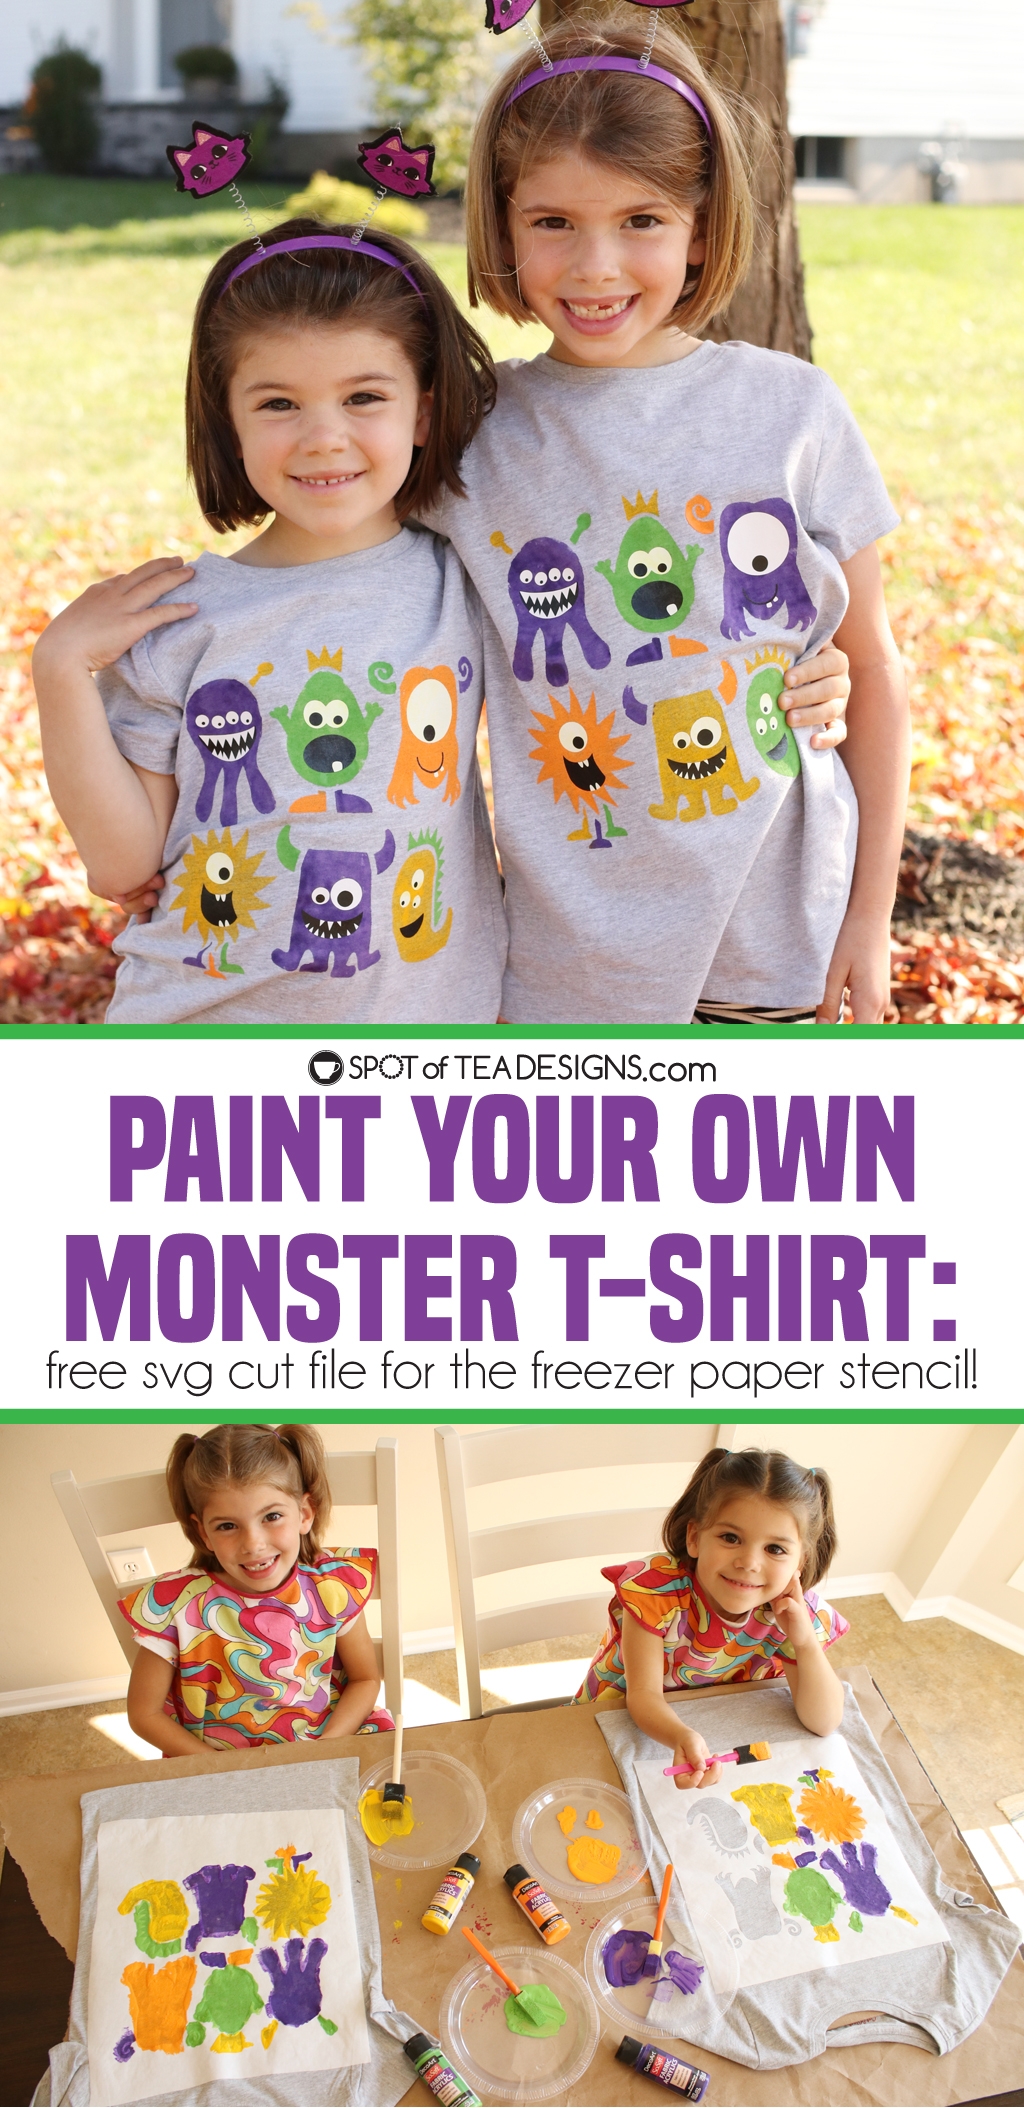
Watch kids get in the spooky Halloween spirit with a monster t-shirt they paint themselves! Let their personality shine and watch their pride grow when adding to their own personal wardrobe when creating this fun DIY! See how to paint your own monster t-shirt using a freezer paper stencil and fabric paint!

DIY Monster T-shirt made with freezer paper stencil and fabric paints | spotofteadesigns.com

DISCLOSURE: I am part of the DecoArt Blogger Program and was provided free product samples which are seen in this post. In addition, this post may contain affiliate links that come at no cost to you. Know I only promote and share products I personally use and recommend! To learn more, please review my disclosure policy.

Long time followers know that this isn’t a new project concept but a well loved one in our house! My girls LOVE painting their own t-shirts made using a freezer paper stencil and fabric paints. We’ve already made summer t-shirts, patriotic stars, a 100 days of school and now they have a Halloween monster t-shirt in their closet!

DIY Monster T-shirt made with freezer paper stencil and fabric paints | spotofteadesigns.com

This Halloween, I let the girls paint their own Monster T-shirt and even asked them to design some monsters I could use as inspiration! I loved the one on the bottom left of her drawing and used him for the top left monster in our design!

DIY Monster T-shirt made with freezer paper stencil and fabric paints | spotofteadesigns.com

Here’s what we used to make our DIY Monster T-shirt:

  • T-shirt (Most of my DIY kids t-shirts use these Cat and Jack ones from Target)
  • Freezer Paper
  • Cricut Maker
  • Cricut EasyPress (or iron)
  • Monster T-shirt design (I created one as a stencil template and one that can be done in different colors of vinyl)
  • Fabric Paint (we used Deco Art’s SoSoft brand)
  • Sponge brush
  • Scrap cardboard

First, cut your design. This DIY t-shirt is different from the others I’ve shared, as I created an area for the kids to paint, which are cut on a freezer paper stencil, but also added black and white eyes using iron on vinyl.

DIY Monster T-shirt made with freezer paper stencil and fabric paints | spotofteadesigns.com

Upload your file to your Cricut Design Space. Make sure you mirror the vinyl black and white shapes as you’ll be cutting them on heat transfer vinyl, but the freezer paper stencil (which I put in orange to make it stand out) must be moved to the center of your screen while in Design Space. This will give you some wiggle room around the edge of the design to prevent any painting mistakes!

DIY Monster T-shirt made with freezer paper stencil and fabric paints | spotofteadesigns.com

To create the freezer paper stencil, set your Cricut to the lowest material setting if it’s an Explore Air 2 or select “Freezer Paper” if it’s a Cricut Maker.

Place your freezer paper on the mat with the shiny side down and send the file to cut. TIP: a fresh blade might be needed since the freezer paper is so thin!

Cut your iron on vinyl during this same cutting step. Don’t forget to mirror!

Weed your vinyl and freezer paper designs. I highly recommend all Cricut crafters have Cricut’s 5 piece basic tool set which includes the weeding hook!

DIY Monster T-shirt made with freezer paper stencil and fabric paints | spotofteadesigns.com

To adhere, lay the shiny side of the freezer paper stencil centered on the front of the shirt. Use your EasyPress or iron to attach this freezer paper stencil in place.

DIY Monster T-shirt made with freezer paper stencil and fabric paints | spotofteadesigns.com

When it comes to painting, first cover your table surface. Insert a piece of cardboard inside the shirt to prevent the paint from bleeding to the back.

DIY Monster T-shirt made with freezer paper stencil and fabric paints | spotofteadesigns.com

When painting with kids (or hey, even us adults) I find it easiest to use a different plate and foam brush for each paint color to keep it all separate.

Smocks are also recommended since it’s fabric paint!

DIY Monster T-shirt made with freezer paper stencil and fabric paints | spotofteadesigns.com

Apply paint to your t-shirt in an up and down motion, not a back and forth painting motion. This will help keep the stencil down and prevent bleeding under it.

With the fabric paint, you can give a full coverage with a heavy application or only put it on lightly to make a more vintage look. Either way, it looks great and it’s hand painted by you!

DIY Monster T-shirt made with freezer paper stencil and fabric paints | spotofteadesigns.com

For this DIY Monster T-shirt, we used tangerine, dioxazine purple, bright yellow and bright avocado green.

They chose their own placement of colors to paint whichever monster and monster parts in whatever colors they wanted! We also discovered part way through that they mistakenly sat in the wrong seats and were actually painting each other’s shirts!

DIY Monster T-shirt made with freezer paper stencil and fabric paints | spotofteadesigns.com

After painting, carefully peel the stencil off, which honestly is my favorite part! DecoArt recommends letting the designs fully dry for 72 hours before wearing or washing.

DIY Monster T-shirt made with freezer paper stencil and fabric paints | spotofteadesigns.com

After thoroughly drying I added the iron on vinyl eyes in place on each of the monsters. (Note: that this step did seem to alter my white vinyl in some places to turn a little yellow, but that added to our monster affect so no one cared!)

DIY Monster T-shirt made with freezer paper stencil and fabric paints | spotofteadesigns.com

These girls will be rocking their DIY Monster t-shirts this Halloween season and probably long after)!

Check out other projects we’ve made using this brand of fabric paint:

DIY Patriotic T-shirt made using freezer paper stencil and fabric paint | spotofteadesigns.com
100 Days of School T-shirt - 100 days brighter complete with free SVG file | spotofteadesigns.com
DIY Mermaid Halloween Costume | spotofteadesigns.com
  • Email a link to a friend (Opens in new window) Email
  • Share on Facebook (Opens in new window) Facebook
  • Share on X (Opens in new window) X
  • Share on Pinterest (Opens in new window) Pinterest
  • Share on Reddit (Opens in new window) Reddit

Related

in Celebrations, Crafts & DIY, Halloween / Fall, Kids' Crafts, SVG Cut Files, Wearables # cricut deco art freezer paper svg cut file

Spotofteadesigns.com Signature Design showing ways to socially follow this DIY/Parenting blogSpotofteadesigns.com Signature showing how to follow on twitter. Username: spotofteadesignSOTD2019SignatureFollow4FacebookSpotofteadesigns.com Signature showing how to follow on pinterest. Username: spotofteadesignSpotofteadesigns.com Signature showing how to follow on instagram. Username: spotofteadesignsSpotofteadesigns.com Signature

Reader Interactions

Comments

  1. MADELINE l NEWTON says

    October 9, 2020 at 11:00 am

    LOVE THE MONSTER T-SHIRTS AND SO EXTRA SPECIAL SINCE THEY EACH PAINTED EACH OTHERS MONSTERS…LOVE THEM SO CUTE …CAN YA TELL I AM A GRANDMA…

    Reply
    • Spot of Tea Designs says

      October 9, 2020 at 11:45 am

      Thanks for commenting! My oldest wore hers to school today because she loves it so much! :)

      Reply

Leave a ReplyCancel reply

This site uses Akismet to reduce spam. Learn how your comment data is processed.

Primary Sidebar

Meet Tara

You can probably find me in my craft room, in front of a computer or behind the camera lens.
LEARN MORE

EMAIL NEWSLETTER SIGN UP

Sign up and be the first to know about new posts filled with printables, svg cut file designs and gift ideas!

Privacy Policy

EASTER

Plastic Easter egg place card craft using fabric | spotofteadesigns.com
Easter basket ideas for tween girls ages 9 and 11 | spotofteadesigns.com
Bunny Pencil Holder Easter Gift Idea - made with cardstock and a Cricut | spotofteadesigns.com
DIY Fabric Giftbag using Oly-Fun | spotofteadesigns.com
Fabric carrot Easter decor with a free template | spotofteadesigns.com
Shop the Spot of Tea Designs Amazon Store front | spotofteadesigns.com

Amazon Associates Disclosure

Tara Nehil is a participant in the Amazon Services LLC Associates Program, an affiliate advertising program designed to provide a means for sites to earn advertising fees by advertising and linking to Amazon.com.
Privacy & Cookies: This site uses cookies. By continuing to use this website, you agree to their use.

To find out more, including how to control cookies, see here: Cookie Policy

LATEST GRAMS

POV: It's softball season and you need a seat in t POV: It's softball season and you need a seat in the dugout or warming up a pitcher.
.
I've made several of these personalized bucket seats which are so easy to do for yourself or as a coach gift! Grab your @cricut, Oracal 651 adhesive vinyl, a white bucket from @homedepot and this seat cover to make it a little more comfy. 
.
Comment SEAT if you need a link to this squishy seat cover that fits right on this bucket!
.
.
#spotofteadesigns #cricutmade #cricutcreated #softballmom #coachgift
Just a few of my 25+ ideas for Easter basket fille Just a few of my 25+ ideas for Easter basket filler ideas for tweens (all things my kids have or had owned!)
.
🐇 Photo Album for Instax photos
🐇 Fairy Lights with Photo Clips
🐇 Lip gloss keychain holders
🐇 Bounce Back Moon Ball 
🐇 This specific activity book
🐇 Hair Tinsel Kit
🐇 Speed Stacking Cups
.
.
Comment EASTER and I'll DM you the link!
.
#spotofteadesigns #easterbasket #tween #easterbasketfiller #easterbunny
Bunny Pencil Holder SVG - use one sheet of cardsto Bunny Pencil Holder SVG - use one sheet of cardstock to cut 6 easy Easter gifts with a @cricut Maker. 
.
SVG: Spot of Tea Designs etsy shop
.
.
#spotofteadesigns #eastercrafts #svgcutfile #cricutmade #cricutcreated
Part 2: 6 Things I learned my first time trying DI Part 2: 6 Things I learned my first time trying DIY Screen Printing 
.
I cannot recommend the beginner kits and tutorial guides from @pigskinsandpigtails to learn this technique more!
.
.
#spotofteadesigns #screenprinting #Cricutmade #50BeforeFifty #DIYScreenPrinting
When is the St. Patrick's Day parade in your town? When is the St. Patrick's Day parade in your town?
.
.
.
#spotofteadesigns #stpatricksday #stpats #stpatricksdayprintable #lotteryticket
Checking another thing off my 50 Before Fifty List Checking another thing off my 50 Before Fifty List, DIY Screen Printing, thanks to @pigskinsandpigtails
.
This technique of using a @cricut machine, vinyl and fabric screen printing ink to create t-shirts is super addicting thanks to Jennifer's Screen Printing with Vinyl beginner kit!
.
.
.
.
#spotofteadesigns #screenprinting #Cricutmade #diyscreenprinting #50BeforeFifty
Follow on Instagram
2025 © Spot of Tea Designs
made by soulmuse