• Skip to primary navigation
  • Skip to main content
  • Skip to primary sidebar
  • About
    • Meet Tara
    • Contact
    • Disclosure
    • Family Photography
    • PR & Advertising
    • Privacy Policy
  • CRAFT
    • Edible Food Crafts
    • Fabric Crafts
    • Home Decor
    • Kids
    • Papercrafts
    • Party DIY
    • Printables
    • SVG Cut Files
    • Wearables
  • PARTY
    • Baby
    • Birthday
    • Christmas
    • Easter
    • Father’s Day
    • Halloween / Fall
    • Mother’s Day
    • Patriotic / Summer
    • School / Grad
    • Sports
    • St Patricks Day
    • Thanksgiving
    • Valentine’s Day
    • Wedding
  • Home
    • Basement / Garage
    • Bathroom
    • Bedroom
    • Entryway
    • Kitchen
    • Living Room
    • Office
    • Outdoors
  • LIFE
    • Blog Life
    • Favorite Products
    • Organization
    • Parenting
    • Travel
Spot of Tea Designs

Spot of Tea Designs

DIY Wedding Hairpiece

in Celebrations, Crafts & DIY, Fabric Crafts, Wedding & Engagement

Weddings can already be so expensive with big ticket items like the venue, catering, dress and flowers. Consider being budget friendly when it comes to your hairstyle! Even if you pay to get your wedding updo done, you can always make a DIY wedding hairpiece for an affordable price that still looks high end for your big day!

Step by step tutorial to make a DIY #Wedding Hairpiece | spotofteadesigns.com

DISCLOSURE: Some of the links in this post contain affiliate links, which come at no cost to you. Know that I only promote products I personally use and stand behind. To learn more about my affiliates, please review my disclosure policy.

For weeks before our September 22nd wedding I saw lots of DIY hairpiece and DIY fabric flower projects around the wedding and as a crafty bride, I knew I could put these concepts together to make a DIY wedding hairpiece for my big day!

Supplies:

  • Satin fabric
  • Tulle Fabric
  • Needle/thread
  • Misc beads, pearls
  • Hair clip
  • Candle
  • Scissors
  • Pencil

Trace and cut different sized circles of satin fabric.  I traced different lids and rolls of tape I had in the house as my different sizes.

Light a candle and wait a few minutes for it to heat up. Bring the fabric circle NEAR the candle, but not too close to the flame. You’ll see when it gets near the heat that it will start to curl up slightly. Make sure you don’t set your fabric on fire! :)

Repeat this action for all different sized circles.
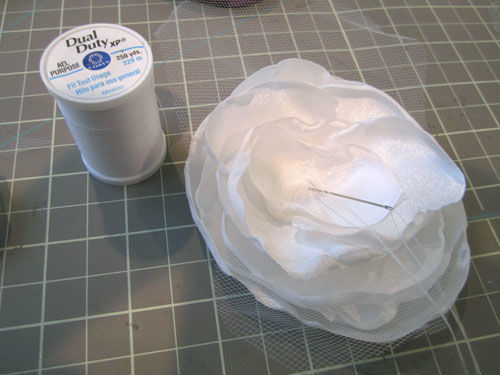
Layer your fabric circles together. Cut circles of the tulle fabric and mix it into the stack of layered fabric to form a flower shape. Sew these layers together with a similar color of thread.

Sew beads and pearls in the middle of the flower to accent.

Sew hair clip onto the back of the flower.
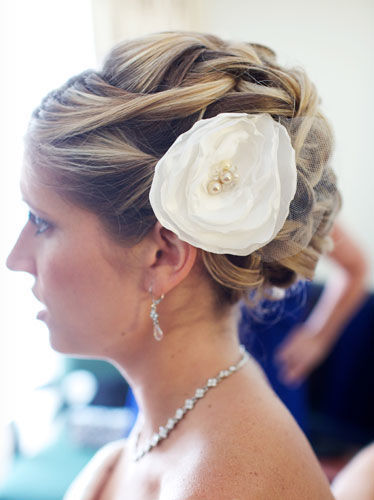
( photo credit: Brad Ross Photography)

The best part? The total cost for this item was $1.53 in fabric (I already had the beads and hair clip).

Wedding Photo as taken by BradRoss.net

This was literally my first attempt at this type of craft and I was happy with the result (aka it’s not so hard!

Spotofteadesigns.com Wedding, photographed by Brad Ross Photography - old house for backdrop

Related Posts

Reverse canvas wedding vows wall art | spotofteadesigns.com
40th Birthday DIY Kentucky Derby Party | DIY Kentucky Derby Hat - spotofteadesigns.com
  • Click to email a link to a friend (Opens in new window) Email
  • Click to share on Facebook (Opens in new window) Facebook
  • Click to share on X (Opens in new window) X
  • Click to share on Pinterest (Opens in new window) Pinterest
  • Click to share on Reddit (Opens in new window) Reddit

Related

in Celebrations, Crafts & DIY, Fabric Crafts, Wedding & Engagement # diy flower our 9-22-12 Wedding

Spotofteadesigns.com Signature Design showing ways to socially follow this DIY/Parenting blogSpotofteadesigns.com Signature showing how to follow on twitter. Username: spotofteadesignSOTD2019SignatureFollow4FacebookSpotofteadesigns.com Signature showing how to follow on pinterest. Username: spotofteadesignSpotofteadesigns.com Signature showing how to follow on instagram. Username: spotofteadesignsSpotofteadesigns.com Signature

Reader Interactions

Comments

  1. Monica says

    November 7, 2012 at 9:08 am

    I love making these kinds of flowers ;) Yours is absolutely beautiful and looks amazing in the photo with your hair all done up. What a beautiful keepsake!
    http://mommysordinarymagic.blogspot.com

    Reply
  2. jamie says

    March 21, 2014 at 12:00 pm

    Gorgeous! I love the fact it is homemade and doesn’t look like it at all! I’m pinning this!

    Reply

Leave a ReplyCancel reply

This site uses Akismet to reduce spam. Learn how your comment data is processed.

Primary Sidebar

Meet Tara

You can probably find me in my craft room, in front of a computer or behind the camera lens.
LEARN MORE

EMAIL NEWSLETTER SIGN UP

Sign up and be the first to know about new posts filled with printables, svg cut file designs and gift ideas!

Privacy Policy

HALLOWEEN

Trick Fil A Trunk or Treat | spotofteadesigns.com
DIY Dorothy Shoes - create your own Dorothy from the Wizard of Oz costume accessory! | spotofteadesigns.com
DIY Sheep Pumpkin made with Poly-Fil Polyester Fiber Fill | spotofteadesigns.com
Zombies Team Halloween Costumes - made with Cricut, vinyl and paint! | spotofteadesigns.com
DIY Rain Cloud Costume using Poly-Fil from @FairfieldWorld | spotofteadesigns.com
Shop the Spot of Tea Designs Amazon Store front | spotofteadesigns.com

Amazon Associates Disclosure

Tara Nehil is a participant in the Amazon Services LLC Associates Program, an affiliate advertising program designed to provide a means for sites to earn advertising fees by advertising and linking to Amazon.com.
Privacy & Cookies: This site uses cookies. By continuing to use this website, you agree to their use.

To find out more, including how to control cookies, see here: Cookie Policy

LATEST GRAMS

What's creepier than a creepy doll? A creepy DISAS What's creepier than a creepy doll? A creepy DISASSEMBLED doll! This DIY project was one I created years ago for a client and all it took was a trip to the thrift store for a bag of dolls, some paint and shopping my house for glass vases and jars! 
.
Give it a try for your Halloween party!
.
.
.
#spotofteadesigns #craftersgonnacraft #makersgonnamake #painting #halloweenparty #halloweendiy #diyhalloweendecor
Here's your sign to find a crafty friend who also Here's your sign to find a crafty friend who also likes to make @cricut crafts with you and pair up to create Halloween costumes for your kids teams. 
.
The 7 sets of costumes we've done together:
- Dalmatians
- Gatorade 
- Jack o'lanterns 
- Dr Seuss Things
- Lifeguards
- Chick Fil A 
- Skeletons
.
#spotofteadesigns #craftersgonnacraft #makersgonnamake #halloweencostume #htv #DIYHalloweencostume #softballlife #softballmom #craftfriends #cricutcrafts #vinyallthethings
HEY YOU GUYS! I cannot believe I never shared this HEY YOU GUYS! I cannot believe I never shared this Goonies Halloween party on my blog! I styled it back in 2017 for a no longer around site that sold party supplies and I loved every minute of it! I love styling things where you can really dig into a theme, especially for a movie I watched so many times. 
.
Scroll through these shots to see all the hints to this nostalgic rewatch
.
.
.
#spotofteadesigns #halloweenparty #halloweentreats #trickortreat #desserttable #halloweendesserttable #craftersgonnacraft #partyinspo #makersgonnamake #goonies #gooniesneveversaydie
It's time to break out the @cricut and get some Ha It's time to break out the @cricut and get some Halloween crafting done! Stay tuned!
.
.
.
#spotodteadesigns #makersgonnamake #craftersgonnacraft #cricutlove #cricutmaker #cricutcrafts #halloweenwearables #vinylallthethings #halloweencrafts
DIY Rain Cloud Halloween Costume with Poly-Fil fro DIY Rain Cloud Halloween Costume with Poly-Fil from @fairfieldworld AD
.
See all the step by step photos, get a link to the exact umbrella I used, grab the free raindrop template and see how to use Poly-Fil both outside and inside this craft to make a DIY costume for a meterology lover!
.
.
.
#spotofteadesigns #FairfieldWorld #PolyFil #PolyfilwithJoy #diycostume #diyhalloween #diyhalloweencostume #raincloud #meterology #craftersgonnacraft #makersgonnamake
Tips to using a t-shirt ruler guide: - Press your Tips to using a t-shirt ruler guide:
- Press your shirt first to get out any wrinkles and moisture
- Lay down your tshirt ruler at the top neck
- Lightly fold your vinyl piece in half to find the center and center it on the guide
- REMOVE the guide before your place your press cloth and heat
.
Comment GUIDE if you want a link to this helpful vinyl t-shirt accessory.
.
.
.
#spotofteadesigns #irononvinyl #vinylallthethings #siserna #cricutmade #cricutcreated #diytshirt #craftersgonnacraft #makersgonnamake
Follow on Instagram
2025 © Spot of Tea Designs
made by soulmuse