• Skip to primary navigation
  • Skip to main content
  • Skip to primary sidebar
  • About
    • Meet Tara
    • Contact
    • Disclosure
    • Family Photography
    • PR & Advertising
    • Privacy Policy
  • CRAFT
    • Edible Food Crafts
    • Fabric Crafts
    • Home Decor
    • Kids
    • Papercrafts
    • Party DIY
    • Printables
    • SVG Cut Files
    • Wearables
  • PARTY
    • Baby
    • Birthday
    • Christmas
    • Easter
    • Father’s Day
    • Halloween / Fall
    • Mother’s Day
    • Patriotic / Summer
    • School / Grad
    • Sports
    • St Patricks Day
    • Thanksgiving
    • Valentine’s Day
    • Wedding
  • Home
    • Basement / Garage
    • Bathroom
    • Bedroom
    • Entryway
    • Kitchen
    • Living Room
    • Office
    • Outdoors
  • LIFE
    • Blog Life
    • Favorite Products
    • Organization
    • Parenting
    • Travel
Spot of Tea Designs

Spot of Tea Designs

How to Use the Cricut Foil Transfer Kit

in Celebrations, Christmas, Crafts & DIY, Papercrafts, SVG Cut Files

Christmas is the perfect time to shine when it comes to crafts and gifts. See how to use the new Cricut Foil Transfer kit to create beautiful, shiny Christmas Wine Tags to pair with holiday gifts! This post includes a free SVG file and step by step photos to use this new tip and tool from the Cricut brand we already love!

Christmas Wine Tags made with the Cricut Foil Transfer Kit | Spotofteadesigns.com

DISCLOSURE: I was provided free product samples from Cricut which are seen in this post in order to facility a review. In addition, this post may contain affiliate links that come at no cost to you. Know I only promote and share products I personally use and recommend! To learn more, please review my disclosure policy.

You may have heard some buzz on the hot new Cricut tool that came out to market recently. I was recently gifted a Foil Transfer Kit from a contact at Cricut to help facilitate a review and am happy to share all that I learned!

Christmas Wine Tags made with the Cricut Foil Transfer Kit | Spotofteadesigns.com

It is always easy to say “yes” to trying out a new Cricut item as you already know I’m a BIG fan of the brand and their tools!

Christmas Wine Tags made with the Cricut Foil Transfer Kit | Spotofteadesigns.com

This new Foil Transfer kit is a great way to add shine to your crafts without the use of heat, like most competitor versions use! I used it with my Cricut Maker, but it also compatible with the Cricut Explore Air 2.

If you’re already familiar with using different tips with your Cricut machine then this new tool will be a breeze. Either way, I have step by step photos on how to use this new kit below!

What’s Included in the Foil Transfer Kit?

Christmas Wine Tags made with the Cricut Foil Transfer Kit | Spotofteadesigns.com

The Foil Transfer Kit comes with the main housing tool that can hold any of the three tips. They are fine, medium and bold thicknesses and are distinguished by the number of lines on the tip, fine being one line.

The initial kit also ten total 4×6″ foil sheets (5 silver, 5 gold) and the tape needed to secure all four sides of each of these pieces for project use. You can also buy additional foil sheets that are as big as 12×12″ in size and in different colors.

How to Create a Project With Foil:

Christmas Wine Tags made with the Cricut Foil Transfer Kit | Spotofteadesigns.com

When you upload an SVG file or create an image that you want to foil in Cricut Design Space (CDS), you will need to click on the line and choose the thickness of foil from the “linetype” drop down menu.

Christmas Wine Tags made with the Cricut Foil Transfer Kit | Spotofteadesigns.com

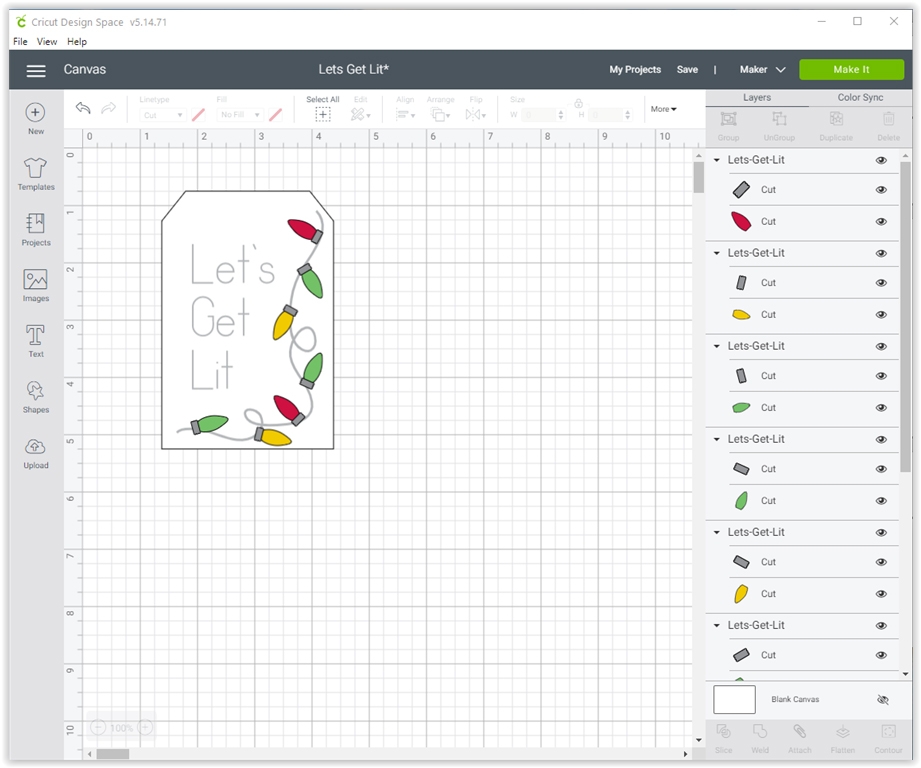
I created this “Let’s Get Lit” Christmas tag using the SVG cut file seen here (available to you free) and the Simple Celebrations writing font in CDS to create the text. I used a mix of bold and medium foil lines for this look and added die cut Christmas light bulbs from cardstock to it afterwards.

Christmas Wine Tags made with the Cricut Foil Transfer Kit | Spotofteadesigns.com

Before going to cut your project, make sure to attach any foil lines to the cut shape you plan to keep it on. In this case, I highlighted the “Let’s get lit” phrase, Christmas line string and white tag shape, right clicked and chose “attach” from the drop down menu. This will let CDS know that these should be all layered on top of one another when created with the machine so that it will foil in the right spot.

Christmas Wine Tags made with the Cricut Foil Transfer Kit | Spotofteadesigns.com

Before cutting, move your tag that will be cut and foiled a little bit away from the edge of the mat. You will need to tape your foil onto the cardstock ONLY (not the mat!) so this helps to give you space for the tape.

Christmas Wine Tags made with the Cricut Foil Transfer Kit | Spotofteadesigns.com

Place your cardstock on your cutting mat. Tape the foil in place SHINY SIDE UP using the tape provided in the kit. Pull it taunt and make sure to only put tape on your paper and not your mat!

How to Foil a Project:

Christmas Wine Tags made with the Cricut Foil Transfer Kit | Spotofteadesigns.com

When working on a project that you have designated to use a foil line, you will be prompted by CDS when it is time to add the tool to your machine. On the screenshot above, on step two, you will see it tells me to “Load Foil Transfer Tool – Medium Tip (2 lines) in Clamp B”.

Christmas Wine Tags made with the Cricut Foil Transfer Kit | Spotofteadesigns.com

Here you see I had removed my fine point blade from the Adaptive Tool System of my Cricut Maker and inserted the Foil Transfer Tool with the foil blade in clamp B. I then closed the clamp to secure the foil tool in place.

Christmas Wine Tags made with the Cricut Foil Transfer Kit | Spotofteadesigns.com

If you’re doing a mix of foil thicknesses, like I did here, you can follow the prompts in CDS on when to switch the tips. Just make sure YOU DO NOT unload the mat between steps!

Christmas Wine Tags made with the Cricut Foil Transfer Kit | Spotofteadesigns.com

I was prompted when to remove the foil and replace the foil tool with my fine point blade for the next step of cutting the tag shape.

Christmas Wine Tags made with the Cricut Foil Transfer Kit | Spotofteadesigns.com

After I created the foil tag, I cut the Christmas light bulbs in each of their designated colors and added a red cardstock mat.

Additional Tips and Tricks:

Christmas Wine Tags made with the Cricut Foil Transfer Kit | Spotofteadesigns.com
  • Tape the Foil Shiny Side UP onto your mat! Those who follow me my Instagram stories know that my first foil attempt was a big fail and that was all my fault! I mistakenly taped the foil on with the shiny side down so it wasted the foil sheet and did not, of course, produce a foil mark onto my tag.
  • Foil looks good on light AND dark colors! I love the other Christmas wine tag I created with gold on dark red. It’s also available to you free on my svg file above!
  • Don’t let your foil sheet touch your Cricut mat! Another mistake I made in trying to lay out my materials on a messy desk. Do yourself a favor and give yourself a clean space before working so you don’t waste any sheets and then have to clean your mat like me.

Other Cricut Tutorial Posts:

Cricut Gift Guide - great ideas for the DIYer and crafter! | spotofteadesigns.com

Cricut Gift Guide: Must Haves for Crafters!

Cricut Beginner’s Guide: Dos and Don’ts Once Getting the Machine

My Amazon Shop which includes a Crafting section for all my favorite tools!

  • Click to email a link to a friend (Opens in new window) Email
  • Click to share on Facebook (Opens in new window) Facebook
  • Click to share on X (Opens in new window) X
  • Click to share on Pinterest (Opens in new window) Pinterest
  • Click to share on Reddit (Opens in new window) Reddit

Related

in Celebrations, Christmas, Crafts & DIY, Papercrafts, SVG Cut Files # cricut cricut tutorial svg cut file

Spotofteadesigns.com Signature Design showing ways to socially follow this DIY/Parenting blogSpotofteadesigns.com Signature showing how to follow on twitter. Username: spotofteadesignSOTD2019SignatureFollow4FacebookSpotofteadesigns.com Signature showing how to follow on pinterest. Username: spotofteadesignSpotofteadesigns.com Signature showing how to follow on instagram. Username: spotofteadesignsSpotofteadesigns.com Signature

Reader Interactions

Leave a ReplyCancel reply

This site uses Akismet to reduce spam. Learn how your comment data is processed.

Primary Sidebar

Meet Tara

You can probably find me in my craft room, in front of a computer or behind the camera lens.
LEARN MORE

EMAIL NEWSLETTER SIGN UP

Sign up and be the first to know about new posts filled with printables, svg cut file designs and gift ideas!

Privacy Policy

HALLOWEEN

Spooktacular Teacher Halloween Thank You Tag and Gift Idea | Spotofteadesigns.com
Broom Hair Don't Care Halloween T-shirt using SVG and Siser's Vernice HTV | spotofteadesigns.com
Group Halloween Costume - Prison Inmates and Prison Guards | spotofteadesigns.com
Dr Seuss Things Group Halloween Costume | spotofteadesigns.com
Gatorade Halloween Costume - colorful group costume idea! | spotofteadesigns.com
Shop the Spot of Tea Designs Amazon Store front | spotofteadesigns.com

Amazon Associates Disclosure

Tara Nehil is a participant in the Amazon Services LLC Associates Program, an affiliate advertising program designed to provide a means for sites to earn advertising fees by advertising and linking to Amazon.com.
Privacy & Cookies: This site uses cookies. By continuing to use this website, you agree to their use.
To find out more, including how to control cookies, see here: Cookie Policy

LATEST GRAMS

Some highlights of what my yard produced this year Some highlights of what my yard produced this year:
🎃 Gourds - currently 42 harvested and drying, but tons more coming!
🌞 Yellow Roses - these 2 plants bloom at least 4 times in spring and summer!
🍅 Tomatoes - tons of Roma and Supersweet 100 breeds used for appetizers, sauces and salads. Happy to grow and to gift these away!
🧄 Garlic - planted last fall and harvested in June. Doing this again this October! Should I also do onions?
💜 Lavender - The bees love them. I missed the window to dry them but putting that on my list to try next year. Would you want a little satchel of lavender? 
🥒 Cucumbers - slice it up and add some sea salt. Yum!
.
.
.
#spotofteadesigns #gardening #vegetables #vegetablegarden #homegrown #backyard
Visit the aerial park @treetopquestphilly for a gr Visit the aerial park @treetopquestphilly for a great adventure! #AD
.
Our group of 2 adults and 5 kids were hosted by TreeTopQuestPhilly and enjoyed a sunny Saturday exploring obstacles, climbing and ziplining and we'd highly recommend this park! 
.
Here some key details to know before you go:
- The staff is super knowledgable, friendly and patient with climbers of all abilities, but it is self paced where you are in control of your own equipment. 
- You attend an equipment fitting, safety instruction and practice course before you climb 
- Expect to spend the full 2.5 hours of your reservation and you likely won't need sunglasses in this shady spot
- Gloves are an optional purchase, but we didn't get them and no one got any blisters
- There are 4 levels of courses with Level 4 being for those 12+ only. It's HIGH but thrilling to those willing to check it out! 
- Porta potties and lockers are available at the check in area and there are plenty of benches and picnic tables to sit at in the park. Spectators are free to watch from below. 
.
PROMO CODE: Use code SPOTOFTEADESIGNS for 15% off your online ticket order to climb!
.
#spotofteadesigns #treetopquestphilly #treetopquest #ziplining #getoutside #familytravel #philadelphia #philly #njmom #kidsactivities
Cardstock pennant banner tip - create the separate Cardstock pennant banner tip - create the separate piece shown on the video and add it to the back of your pennant to help it hang more securely, hide the ribbon and not move as much when hung. 
.
Special thanks to @wildercrafting who shared this tip YEARS ago, and I still use it when creating my simple banners.
.
.
.
#spotofteadesigns #cardstockcrafts #cricutmade #cricutcrafts #craftersgonnacraft #makersgonnamake #lemonadestand #fundraiser #pennant #banner #garland
If you're on a fence about creating a garden next If you're on a fence about creating a garden next year.... do it! While I personally don't eat everything we grow (not a pepper fan!), I do enjoy being outside, caring for the plants, and feeding friends and family! 
.
You can start this fall with garlic! You start planting them in the fall, and you'll enjoy them by summer. 
.
.
.
#spotofteadesigns #gardening #garden #tomatoes #cucumbers #bruschetta  #homegrown #vegetables #vegetablegarden
Twins run on my dad's side of the family, so I gre Twins run on my dad's side of the family, so I grew up thinking I might have my own pair. Little did I know it would be a pair of birthday twins born 2 years apart! Join me in celebrating my favorite DIY creations turning 10 and 12 today! 🎉
.
.
.
.
#spotofteadesigns #happybirthday #tweens #thisis10 #doubledigits #thisis12 #birthdaytwins
Want to know how to celebrate National Potato Day Want to know how to celebrate National Potato Day thanks to @fairfieldworld AD ?
.
Craft a giant baked potato out of recycled goods and filled with fluffy Poly-Fil! This fun craft material can be used inside and outside of crafts! Whether it's to make an oversized starch filled vegetable statement piece or you use it to make a baked potato costume, this fluffy stuff should be a staple material in your craft closet!
.
.
.
#FairfieldWorld #PolyFil #PolyfilwithJoy #bakedpotato #giantfood #recycled #upcycled #nationalpotatoday #craftersgonnacraft #makersgonnamake
Follow on Instagram
2025 © Spot of Tea Designs
made by soulmuse