• Skip to primary navigation
  • Skip to main content
  • Skip to primary sidebar
  • About
    • Meet Tara
    • Contact
    • Disclosure
    • Family Photography
    • PR & Advertising
    • Privacy Policy
  • CRAFT
    • Edible Food Crafts
    • Fabric Crafts
    • Home Decor
    • Kids
    • Papercrafts
    • Party DIY
    • Printables
    • SVG Cut Files
    • Wearables
  • PARTY
    • Baby
    • Birthday
    • Christmas
    • Easter
    • Father’s Day
    • Halloween / Fall
    • Mother’s Day
    • Patriotic / Summer
    • School / Grad
    • Sports
    • St Patricks Day
    • Thanksgiving
    • Valentine’s Day
    • Wedding
  • Home
    • Basement / Garage
    • Bathroom
    • Bedroom
    • Entryway
    • Kitchen
    • Living Room
    • Office
    • Outdoors
  • LIFE
    • Blog Life
    • Favorite Products
    • Organization
    • Parenting
    • Travel
Spot of Tea Designs

Spot of Tea Designs

Brielle’s Nursery: Stenciled Pillow using #TulipForYourHome

in Crafts & DIY, Home Decor

NOTE: This post was sponsored by iLoveToCreate in partnership with Blue Print Social.

Tulip #ForYourHome Stenciled Pillow Tutorial | spotofteadesigns.com

Disclosure: I was compensated by iLoveToCreate via Blue Print Social for these items, but the opinions expressed and project created are all mine. For more information on my disclosure policy, please visit this page. 

Recently I had the opportunity to test out some new home décor crafting products from the Tulip brand made by iLoveToCreate called “For Your Home”.  I was game and VERY excited to see that Fed Ex delivery guy pop out of his truck with a big box for ME! Check out what was inside:

Stenciled Nursery Pillow tutorial featuring Tulip #ForYourHome Stencils and Paints | spotofteadesigns.com

Supplies:

  • Tulip Large Chevron Textile Stencil
  • Tulip Butterfly Motif Stencil
  • Tulip Rose Motif Stencil
  • Tulip Timeless Elegance Soft Fabric Paint Collection (2 metallic and 2 matte colors)
  • Tulip Paint Roller
  • Tulip Stencil Spray Adhesive
  • Tulip Grey 16 x 16″ Pillow Cover
Stenciled Nursery Pillow tutorial featuring Tulip #ForYourHome Stencils and Paints | spotofteadesigns.com

I was also excited to see the pillowcase I was sent was grey since I knew it’d match the décor in Brielle’s pink, grey and white nursery! I thought the metallic nickel color and sunflower yellow would work best so I got to work.

First, I prepped all my materials by ironing the pillow case and setting out newspapers to protect the surface of Derek’s lovely garage floor. Ok that first part is a lie. Derek ironed the pillowcase when he was ironing his work pants. haha.  I read the tip in the instructions to put wax paper inside to prevent bleeding but since I felt I needed a little more of a stiff surface inside, I added both a piece of cardboard and wax paper.

Stenciled Nursery Pillow tutorial featuring Tulip #ForYourHome Stencils and Paints | spotofteadesigns.com

I sprayed the back of the chevron stencil with stencil spray adhesive and laid it down flat on my pillow case, patting it down firmly all around. I really think this spray was KEY to making sure the stencil stayed down. They did have these little arrow markers on each side of the stencil to help center it, but if you must know, I’m not much of a measuring type when crafting and usually eyeball things, so that’s what I did!

Stenciled Nursery Pillow tutorial featuring Tulip #ForYourHome Stencils and Paints | spotofteadesigns.com

I was really looking for that “tone on tone” look with the nickel grey metallic paint on the grey pillow.  I read that “less is more” with the paint so I roll it on the plate a bunch of times before applying to the pillow. Trust me, this was the scariest part… to take the plunge and roll the paint on!

Stenciled Nursery Pillow tutorial featuring Tulip #ForYourHome Stencils and Paints | spotofteadesigns.com

I let it dry for a few minutes and then crossed my fingers and peeled off the stencil. I was pleasantly surprised to see a crisp lines of the stencil and no bleeding! Again, I think it was the spray adhesive and the light layers that made that happen.

Stenciled Nursery Pillow tutorial featuring Tulip #ForYourHome Stencils and Paints | spotofteadesigns.com

After that layer dried completely, I repeated the process with a second layer using the butterfly stencil.

Stenciled Nursery Pillow tutorial featuring Tulip #ForYourHome Stencils and Paints | spotofteadesigns.com

I rolled on the “sunflower” yellow paint and crossed my fingers again when peeling that stencil up!

Tulip #ForYourHome Stenciled Pillow Tutorial | spotofteadesigns.com

The pillow came out cute! I especially love that the fabric paint is soft so it allowed the pillow to still be a flexible comfy shape for my glider chair!

HOWEVER… I wasn’t sure that the yellow really “went” with the décor of her room after seeing it in there. I decided to flip the pillowcase over and do another design on the second side, knowing I could have two options! I’ve always wanted to do a button collage craft so this was my chance!

Tulip #ForYourHome Stenciled Pillow Tutorial | spotofteadesigns.com

I created the chevron pattern again with the nickel silver paint, as I loved that look the first time.  Next, I used a pencil and traced the butterfly stencil onto the front of the pillow as my guide.

Stenciled Nursery Pillow tutorial featuring Tulip #ForYourHome Stencils and Paints | spotofteadesigns.com

TIP: I also traced the same butterfly stencil onto a piece of scrap paper and used temporary adhesive to secure the buttons on. This allowed me to easily lift a button from my template and sew it onto my pillow in the same place.

Tulip #ForYourHome Stenciled Pillow Tutorial | spotofteadesigns.com

I used pink thread to secure the buttons really well with lots of layers of stitching to make sure little miss wouldn’t pull them off.

Tulip #ForYourHome Stenciled Pillow Tutorial | spotofteadesigns.com

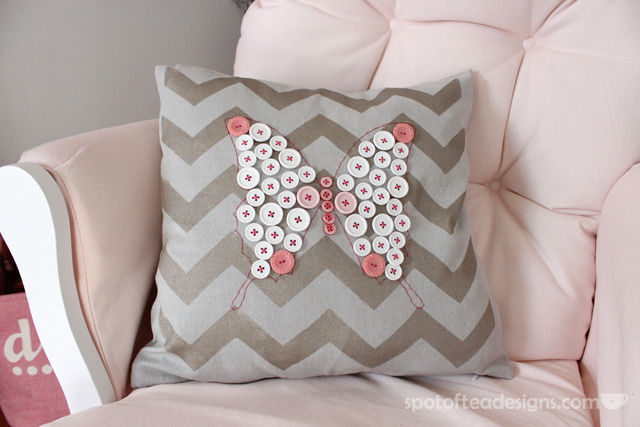
Lastly I sewed around the outline to complete the shape.

Tulip #ForYourHome Stenciled Pillow Tutorial | spotofteadesigns.com

I’m happy to have a double sided decorative pillow to add to her room. So, tell me, which pillow side so you like better?

To find more inspirational projects using the Tulip brand of home décor stencils, connect with iLoveToCreate on Facebook | Pinterest | Twitter | Blog


  • Click to email a link to a friend (Opens in new window) Email
  • Click to share on Facebook (Opens in new window) Facebook
  • Click to share on X (Opens in new window) X
  • Click to share on Pinterest (Opens in new window) Pinterest
  • Click to share on Reddit (Opens in new window) Reddit

Related

in Crafts & DIY, Home Decor # blueprint social i love to create sponsored

Spotofteadesigns.com Signature Design showing ways to socially follow this DIY/Parenting blogSpotofteadesigns.com Signature showing how to follow on twitter. Username: spotofteadesignSOTD2019SignatureFollow4FacebookSpotofteadesigns.com Signature showing how to follow on pinterest. Username: spotofteadesignSpotofteadesigns.com Signature showing how to follow on instagram. Username: spotofteadesignsSpotofteadesigns.com Signature

Reader Interactions

Comments

  1. Holly Craft says

    May 6, 2014 at 6:46 am

    Buttons…..but I love buttons!

    Reply
  2. Mindie Hilton says

    May 6, 2014 at 10:18 am

    Pretty pillows! You are more then welcome to share your nursery stenciled pillow at the Anything Goes linky, if you have not already.

    Reply
    • Spot of Tea Designs says

      May 9, 2014 at 7:56 am

      Thanks for the invite! I’ll check it out!

      Reply
  3. Evelin says

    May 6, 2014 at 4:30 pm

    You make it look so easy! And yup, definitely buttons. Though I don’t know how comfy it is to lean on them? Love the yellow + chevron too, but don’t like that the butterfly turned out transparent.

    Reply
    • Spot of Tea Designs says

      May 9, 2014 at 7:57 am

      Thanks for voting, Evelin! :)

      Reply

Leave a ReplyCancel reply

This site uses Akismet to reduce spam. Learn how your comment data is processed.

Primary Sidebar

Meet Tara

You can probably find me in my craft room, in front of a computer or behind the camera lens.
LEARN MORE

EMAIL NEWSLETTER SIGN UP

Sign up and be the first to know about new posts filled with printables, svg cut file designs and gift ideas!

Privacy Policy

VALENTINE’S DAY

XOXO Valentine Bag Toppers - printables to dress up your Valentine's Day gifts this February | spotofteadesigns.com
DIY Valentine Sock Plush Tutorial | spotofteadesigns.com
Smiley face eraser Valentine Printable | spotofteadesigns.com
Magnetic Bookmark Valentine Printables | spotofteadesigns.com
Valentine Cookie Decorating with Kids | spotofteadesigns.com
Shop the Spot of Tea Designs Amazon Store front | spotofteadesigns.com

Amazon Associates Disclosure

Tara Nehil is a participant in the Amazon Services LLC Associates Program, an affiliate advertising program designed to provide a means for sites to earn advertising fees by advertising and linking to Amazon.com.
Privacy & Cookies: This site uses cookies. By continuing to use this website, you agree to their use.

To find out more, including how to control cookies, see here: Cookie Policy

LATEST GRAMS

Thanks to everyone who followed along with all my Thanks to everyone who followed along with all my crafty adventures in 2025! I look forward to inspiring and collaborating with more of you in 2026!
.
.
.
#spotofteadesigns #fairfieldworld #siserna #cricutmade #Makersgonnamake
My round up of favorite books of 2025 is here! . My round up of favorite books of 2025 is here! 
.
Comment 2025BOOKS and I'll send you my blog post which lists each of these favorites broken out by genre with a short, non spoiler description of the book so you can add them to your TBR list for your 2026 reading challenge!
.
.
.
#spotofteadesigns #favoritebooks #bookworm #bookreader #readingchallenge
Itching to do a one more quick craft for the year? Itching to do a one more quick craft for the year? Cut out these fun "Cheers" cupcake toppers and add them to your NYE desserts. 

Pst - while I do sell this svg cut file in my etsy shop, I also offer it free on my blog. Just search "cheers" on my blog and it will come right up. 
.
.
.
#spotofteadesigns #sotdsvg #svgcutfile #NYE #cardstockcrafts
Merry Christmas! Merry Christmas!
These have been HOT sellers the last few days. I a These have been HOT sellers the last few days. I assume it's for all of us who ran out of time or have someone who's hard to shop for (cough teenagers cough). 
.
Grab any one of my three Christmas money holders and roll up a bill to be held inside in my etsy shop.
.
.
. 
#spotofteadesigns #sotdprintable #instantdownload #lastminute #moneyholder #christmascash #makersgonnamake
Capture the season and your child's handwriting wi Capture the season and your child's handwriting with this fun activity sheet.
.
Comment CHRISTMAS FREEBIE for a link to my collection of free printable Christmas activity sheets, including this time capsule, you can use for your nightly visiting holiday character, holiday parties or just for fun! 
.
.
.
.
#spotofteadesigns #sotdprintable #christmasfun #hollyjollychristmas #christmasprintable kidsactivities elfideas
Follow on Instagram
2025 © Spot of Tea Designs
made by soulmuse